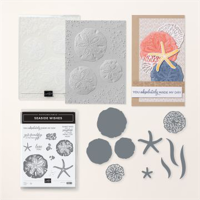
This Seaside Wishes and Hybrid Embossing Folder — I am having so much fun playing with this bundle!
In case you are not familiar with the phrase ‘hybrid’, it simply means that the embossing folder and dies can work simultaneously (or separately). I just love how simple it is and how much time it saves.

I was in the mood for a technique the other day and it seems that one prompted another and then another. This project will showcase the the last of our four quick and easy techniques… Smooshing!


This project’s technique is a pretty easy one! Smooshing is just the action of directly adding ink with your ink pad onto your glass mat (or you could use an acrylic sheet)!

After all your ink colors are on the mat (I used Petal Pink and Soft Sea Foam), spray the mat with your Stampin’ Spritzer (or any spray bottle – but I do think using the Spritzer gives you more precise direction).
After having the ink spread from the spray, take your trimmed card stock and smoosh the paper into the watery ink until you are happy with the result. Set aside to dry.

Here are the quick measurements for this project…
- Basic White (Thick) CS: 11″ x 4 1/4″ and score at 5 1/2″
- Smoky Slate CS: 5 1/4″ x 4″
- Country Lace DSP: 5″ x 3 3/4
- Country Lace DSP: 5″ x 1 1/2″
Here is the quick step-by-step for this project…
- Trim all layers as noted above
- Adhere the card stock layer to the card base
- Adhere both DSP layers to the card base
- Crop a few pieces (seaweed dies) from Smoky Slate card stock
- Crop the shell (outline die) from both Soft Sea Foam and Petal Pink card stock
- Emboss and crop the three images from the ‘smooshed’ card stock using the Seaside Wishes Hybrid Embossing Folder
- Use any extra space on the ‘smooshed’ layer to crop any dies that may fit
- Stamp the sentiment in Smoky Slate ink onto Basic White card stock and trim around sentiment
- Arrange and adhere the die cuts over the DSP layers
- Adhere the sentiment tag over the die cuts with Dimensionals
- Add a few Transparent Adhesive-backed Dots to the card front

If you missed any of the recent Seaside Wishes projects, see below for the link:
- Inking Up Your Embossing Folder/Using Sponge Daubers, CLICK HERE!
- Kissing, CLICK HERE!
I hope you liked this project showcasing a few of the fabulous new products from the 2024-25 Annual Catalog and a few of my favorite go-to techniques!
Click below to see the full list of available products in the recent release of ONLINE EXCLUSIVES!


This card project is one of four that are included in the Seaside Wishes Tutorial Pack! Check out all the tutorial packs in my library! Now I can offer an Instant Download for all of my 2024 & 2023 Tutorial Packs!

I finally have my Tutorial Shop back up and running! Check out all the tutorial packs in my library! Now I can offer an Instant Download for all of my 2024 & 2023 Tutorial Packs!
Click here for some FAQ about my Tutorial Shop!

August ’24 Host Code -NDSUUR2G

Use this code on any order under $150. If your order is over $150, you will receive your own (10%) Stampin’ Rewards! You will be prompted to enter your FREE products at checkout.
Any order ($50+) you place with me this month, you will receive a FREE gift and a handmade card as a thank you from me! (If your order is under $50, you will still receive a handmade card from me as a thank you for your order)!

![]()

LOLLY POP PAPER AND INK RESOURCES
HOW TO EARN FREE PRODUCTS … with the LollyPop Rewards Program!
(ALMOST) WEEKLY EMAIL INSPIRATION… subscribe to my email list
THE $99 ULTIMATE BUNDLE… join the fun!
SHOP MY STORE… shop online 24/7!
My project supply list! Click products to shop online!