


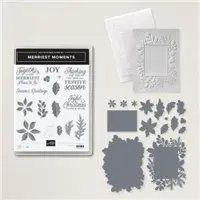
This Merriest Moments Bundle was surely a surprise for me! I just couldn’t appreciate the products in this bundle individually… until I started to play! And then I just did not want to stop!

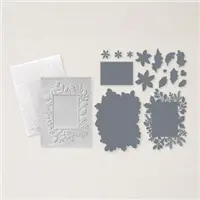
The Merriest Moments Bundle includes ALL the things you see here in the photo below. That’s right! The embossing folder is very much included… and it one of the stars of the show. It is not our usual but beautiful folder… this is called the Merriest Frames Hybrid Embossing Folder! And all that means is that the die cuts can actually fit perfectly within the folder for beautiful and perfectly detailed raised images!


I showcased this bundle on my Facebook Live yesterday, so you can take a peek at the various ways to use these products below if you are more of a visual person! I show the finished projects at the end of the video, but here are a few details to remember for each of them.
- If you are using the full embossed image as your card front, you will need to trim your paper to 5 1/2″ x 4 1/4″ for full coverage or 5 1/2″ x 4″ if you prefer to leave a slight border around the layer.
- The card above was trimmed for full coverage on the card base

The card below was first cropped with the large solid die in Evening Evergreen CS and then cropped with the intricate die from Basic White CS. The same die cut was then embossed with the Merriest Frames Hybrid Embossing Folder to create the beautiful raised details. The die cut fits in the folder so perfectly for an easy fit!
My basic layers and color combination for this project was Evening Evergreen, Sahara Sand and Basic White. A simple strand of the Evening Evergreen Chevron Ribbon and a bow with Linen Thread gave it a tiny pop of color to ground the focal image.
- The large solid layer (Evening Evergreen) can be trimmed to 5 1/2″ x 5 3/4″ before cropping so the entire image will fit in the Stampin’ Cut & Emboss Machine and all edges of the image will be cropped evenly
- The intricate layer (Basic White) can be trimmed to 5 1/2″ x 4 1/2″ before cropping


In the photo below, I reversed the process for the photo below by using Basic White for the solid die cut and Soft Succulent for the intricate die (which was cropped, embossed and then layered over the solid die cut). Both layers were mounted with dimensionals over a piece of DSP from the Tidings from Christmas DSP!
The sentiment layer was cropped with the stitched rectangle die from the set from Basic White CS and stamped with Cherry Cobbler ink. The tiny flower was easily cropped with the three little flower dies from this set.


Here is another design using the bundle and a print from the Tidings of Christmas DSP.


These last two designs were created by layering the embossed die cut (Real Red) over the full embossed layer (Basic White) showcasing both the die cut and the beautiful edges of the embossing.


I am in love with this bundle and I hope you will give it a try! So much fun and the variations are endless with these stamps, dies and fabulous embossing folder!
Here is the Facebook Live replay if you would like to see the step-by-step up close and personal!
I hope you liked today’s projects!

![]()
[sig]
My project supply list. Click on products to shop online.


Great cards. But that first one is a really elegant creation!
Lori
I love what you’ve done with this bundle and will be trying to create my Christmas card copying some of your suggestions. Thanks so much for the layering ideas!
Blessings
Nancy B
These creations are absolutely GORGEOUS, and you know….I cruised past that bundle in the catty until I saw your posting and then rushed to order it. Thank you sooo much!!!!
Thanks so much, Juliette!
What ink colors did you use in the first card?
I used Blushing Bride and Garden Green (stamped off)!
I absolutely am sold on getting this set just because of your beautiful creative designs. Very impressive! Thank you so much for the ideas!
Thanks, Trisha! You’re going to love it!
Your cards are beautiful & you explain the “ how to assemble “ so clearly. TFS!
Thanks so much, Linda!
Absolutely beautiful cards! I love them all and your instructions are simple and clear. tfs
Thanks so much, Karen!
First time watching you — from Connecticut
Hi Barbara! I was a very long-time resident of CT (Ridgefield & Danbury)!
Your cards are beautiful. I think this set could be used for more than christmas.
Thanks, Rhonda! I totally agree about using it all year!